Showing posts with label Väva. Show all posts

Sunday, 19 March 2017

Weaving at the Almeerse Wolunie

From this year, our guild ’de Almeerse Wolunie’ rents a room in an artists ’factory’. Initially only for half a year, the coldest months and the period that we cannot work in the sheeps ’stable’ because of lambing time, which is March and April.and luckily, the rent is extended to last a year. The weaving looms, spinning wheels, worktable and the shop inventory are moved here. Look how spacious it is now!

De Almeerse Wolunie heeft dit jaar een atelierruimte gehuurd. In eerste instantie voor een half jaar, de koudste maanden en ook de periode dat de schaapskooi dicht is vanwege het lammeren, gedurende maart en april. Maar nu is besloten om de huur te verlengen tot een jaar.
De weefgetouwen die we hebben zijn verhuisd, net als een paar spinnewielen, de artikelen van de wolwinkel en de werktafel.


Last year I started setting up weaving n the storage area of the sheep stable, but it was cold, damp, crammed, dark, so it was all but inviting to work there.
But that is all in the past! Yesterday I continued setting up the weaving, and hurray, the real weaving can start! Actually, setting up the weaving loom (I don’t know the terminology of all the steps) takes an enormous amount of time, which is not at all known to those who have never seen or done it. So it is really justified with a little celebration!


I also hung up a shawl that is for sale in our shop.


Vorig jaar was ik enthousiast begonnen een schering op te zetten. Toen stonden de weefgetouwen in het magazijn, waar het smal, donker koud en vochtig was. Al gauw belandde er van alles onde (zakken uienschillen) en bovenop (weeframen die geschonken waren) wat elders niet neergelegd kon worden. Verre van ideaal dus, maar inderdaad, er was geen ruimte voor, en ik ben er ook niet mee verder gegaan.
Maar dat is allemaal verleden tijd! Gisteren heb ik echter, in het nieuwe atelier, het geheel afgemaakt zodat het eerste draadje geweven kon worden. Alleen zo ver dat de schering recht kwam te zitten, maar toch… Het echte weven kan beginnen!

Ook een sjaal opgehangen die in de wolwinkel verkocht kan worden.


Wednesday, 8 February 2017

Wol en Wiel Februari 2017

Vandaag kwam de spingroep Wol en Wiel bij elkaar in Biddinghuizen, bij Hennie in de blokhut. Het was heel koud buiten en de gaskachel en het extra ingeschakelde electrische kacheltje deden extra hun best om de temperatuur aangenaam te maken.

Ik had Romney wol mee om te spinnen, geverfd met afrikaantjes van de verfplantentuin die onderhouden wordt door leden van de IVN en van de Wolunie. Een hele mooie helder gele kleur! Ik vind het zo’n mooie gele kleur dat ik zaadjes heb gekocht om van het voorjaar in mijn eigen tuin te zaaien. Slakken zijn er dol op hoorde ik al, en die hebben we in overvloed dus het gaat een harde strijd worden…

Voor Anneke had ik twee Romney vachten mee. Dat had ze gevraagd toen ik vertelde dat Coby en ik zouden gaan helpen bij het schapen scheren voor de Almeerse Wolunie. Zij had in de afgelopen maand ‘anonieme’.witte en donkerbruine wol gesponnen. De witte, een vrij dikke draad, had ze getwijnd met een glanzende synthetische draad en het was een heel leuke streng geworden, met een beetje boucle-achtigs over het geheel. De bruine had teveel twist, vond Anneke. Dat kan gebeuren, en vooral als je een draad als enkele draad wilt houden is het belangrijk om niet teveel twist aan je draad te geven. Wassen en onder spanning laten drogen maakt de draad wel minder kronkelig, maar zodra je hem weer wast springen de kringelkronkeltjes er gewoon weer in. Breien met alleen recht, of gerstekorrel, zorgt ervoor dat het breiwerk niet scheef trekt.

Mijn breiwerkje nam ik ook mee om te laten zien, en de steek die dit patroontje geeft (Estlands schub-patroon) is heel eenvoudig: 2 recht, 1 omslag, 2 recht, 2 recht samen breien. Als je rondbreit en een veelvoud van 6 steken hebt opgezet en dit steeds herhaalt krijg je een draai-effekt. Als je na elke 4 toeren van kleur wisselt krijg je kleine ruitjes in je breiwerk. Wil je eerst een boordje breien voor bv polswarmers, dan kun het het beste de boord in een veelvoud van 5 steken opzetten. Als de boord klaar is meerder je elke 5 steken 1 steek zodat je op een veelvoud van 6 steken uitkomt. Het boordje kan in ribbels (1 ronde recht breien, dan 1 averecht enz.) of een rib-patroon – herhaal dan (2 recht, 2 averecht, 1 recht) want dat sluit mooi aan op het schubbenpatroontje.

Reny was druk aan het dik spinnen met een weerbarstige blauwe texelaar vacht. De lanoline was wat stijver geworden dus was het een hele klus om de wol uit te trekken. De doorzetter wint, en ze was bijna klaar. Poeh! Daarnaast liet zij haar wolwinder zien, die gelijk twee of meerdere draden om elkaar kan twisten, zodat je een goed gemeleerd breiwerk krijgt wanneer je met meerdere draden werkt. Ze had twee proeflapjes gebreid om het verschil te demonstreren tussen het breien met twee losse draden en het breien met twee om elkaar gedraaide draden anderzijds. Een duidelijk verschil! Geweldig, zo’n degelijk apparaat, het was minstens 25 jaar oud. Op internet staat dat hij weer gemaakt wordt, maar ik zag alleen dat je ‘m kon kopen op e-bay.

Petra had niet zoveel gesponnen, zij doet het rustig aan en is pas onlangs weer begonnen wat te spinnen. Het gaat langzaam beter. Volhouden dus!  Ze had een hele zak Shetland wol mee voor Helga, ik ben heel benieuwd naar jullie ervaring met deze wol!

Helga had geverfd met voedingskleurstoffen van de toko, en prachtige bostinten bereikt. Een heel mooi voorbeeld van een onverwachte en heel effektvolle toepassing. Wel in de keuken gebruikt, maar niet om op te eten!

En Coba had weer geweven (ze volgt een weefopleiding en maakt hele mooie weefsels). Deze keer was haar weefsel niet gemaakt met een weefgetouw, maar met stokjes. Een ‘peg loom’ of stokweefgetouw, met 31 stokjes verdeeld over 50 cm. Het weefsel is soepel, en volgens Coba ontzettend makkelijk (en leuk!) om te maken.

Hennie heeft kleine gevilte poppetjes in een gevilt bedje gemaakt. De bedjes zijn gemaakt van kleine, vervilte geweven vierkantjes die ze geborduurd heeft en de poppetjes zijn gevilt rond een vormpje en ook geborduurd op het lijfje. Verder breit ze stug door aan de omslagdoek met schaapjes, en ook aan een buideltasje in de twijnend breien techniek.

Cobie liet haar prochtige gebreide vest zien wat af is! Het patroon, met kabels en ajourwerk, maakte het vest heel warm, en met veel elasticiteit. De bedoeling was eigenlijk een wat dunner en lichter vest zei Cobie, maar het resultaat is prachtig! De foto’s doen geen eer aan het vest, ik vergat even te fotograferen toen ze het aan had.

Verder liet ik mijn gesponnen-gebreide-vervilte sloffen zien, waarover meer te lezen is op Ravelry: Vervilte pantoffels.

Tuesday, 3 May 2016

Voorjaar op z'n best

Het is heerlijk warm voorjaarsweer. Blauwe luchten met wat wolken.


Nog kale bomen vol knoppen.
En bosanemoontjes die bloeien.


Mijn man en ik zijn in het bos om de berkenboompjes wat uit te dunnen.


Dan ziet hij soms ineens een mooi vogeltje.


Verder ben ik bezig om bollen te wikkelen van mijn Leicester Longwool garen, plantaardig geverfd, om er later een dunne deken van te weven.


Sunday, 6 December 2015

Walnut and heat

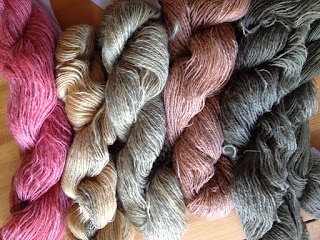
This fall I have been dyeing fiber with various dyestuff, all natural, like reed, onion, walnut, birch, madder, indigo and cochineal. This blog post will cover what I did with one single dye pot of walnut extract, and show the results of that.

During my dye-period this fall there was a lot of experimenting, but also a lot of reading. My experience with natural dyeing in earlier years was mainly the 'standard' way of dyeing, and with standard, I mean cooking an extract from a natural dye source (plants), filtering the extract so no plant material is left, pre-mordanting the fibers, and simmering the fibers in the extract at 85-95 deg C for about an hour, rinsing the fibers and let them dry. This fall, on the contrary, I did a lot of reading on the web, and noticed that there are a hundred ways or more to dye wool, which all lead to a result, all nice and some with stronger colors than others.

On the walnut dyeing, I noticed a few differences from the 'standard' dying as I have done before:
(1) No mordant is required. This is actually no new approach, it has been known long time that walnut contains a matter that acts as mordant (tannin), and also in my second hand books from the seventies this information is shared as common knowledge. It was just that I didn't know that yet.
(2) The dye bath can be extracted from the husks without heating the dye pot. Let the sun and time do their work, lower temperatures need more time, but in the end, many report on the web, the walnut dye bath is as good as any 'cooked' dye bath.
(3) The dye bath to dye the fibers does not need heating. The same mechanism of sun and time will result in the same results as when your simmer the fibers a shorter time in the dye pot.
(4) Let the fibers dry after you lift them out of the dye bath before you rinse. This would result in more dye sticking to the fibers than if you rinse immediately after taking them out of the dye bath.
(5) The walnut dye bath can be used many more times than other dye baths (in general, dye baths can be used 2, sometimes 3 times before the color is too weak to be interesting), every time resulting in lighter browns, eventually more towards a greyish brown, but still interesting.
(6) The walnut dye bath can be stored and re-used later on, even if mold has built on the surface. In fact, the mold itself can be left in the dye bath as it also contains dyestuff.

A friend of me kindly gave me two bottles of extracted walnut dye bath, extracted from walnut trees in France which grow around her holiday cottage. The extract was really strong, looking pitch black where it sat in the bottles, almost 3 liters in total. I was very happy to receive this gift! This was the basis for my experimenting. Obviously, I could not apply (2) - no heating to extract the dye as my friend already had done this for me. All the other points, except the last one (storing the bath) I have applied, and in this post I will show you the results. In total, I dyed 5 skeins of varying weights, the heaviest first and last. Four of the skeins are from the same sheep, from the less soft part of the fleece, and I plan to weave with it. The fifth and last skein is from another sheep, spun a bit thicker but the most remarkable difference is that it has more crimp and the yarn therefore is more 'round' than the other four. This is the result

OK, this is what I did, (1) to (5) lay from left to right:
(1) Put the skein in a big glass pot with the cold dye and let it stand in the window (afternoon October sun) for a whole week. Took out the skein and rinsed it (forgot to let it dry first). The color is nice, but I had expected a deep, dark brown. Apparently, just weak October sun is not enough.
 (2) Put in next skein in the same pot, and whenever I used my oven to prepare a meal, the pot went into the oven when the food was taken out, and was warmed up in the after warmth to a nice, warm temperature, but not hot. This happened 3 times during the week the skein was in the pot. Then, I took it out, squeezed it and hung it up to dry. After it had dried, I rinsed it. Darker, but still not the deep, dark brown I expected.
(3) Put the dye bath (still very dark brown, almost black) in a pan, put in a skein and simmered for one hour.
(4) Added next skein and simmered for another hour (with the skein from (3) still in it as well). Let it cool until the next morning. Squeezed and hung to dry. Rinsed afterwards.
(5) Put in the last skein, simmered one hour, squeezed, dried, rinsed.

Conclusion: HEAT wins over TIME. The higher and longer the heat, the darker the color, until the dye bath gets exhausted and the last skein gets a more greyish tone than the others. The Octobersun could not compete with the 90 degrees from the stove, but already some mild warmth from the over is better than the windowsill.

Whether drying before rinsing improves the color, I don't know as I did not test both ways, but the colors are nice and dark, so whenever I have the time and opportunity I will apply that method (if I remember).

Friday, 18 September 2015

Hello dear friend

Today I will show you something that was completed several years ago and something else that was created today.

Two years ago, I worked with ceramics. I enjoyed it a lot, and still miss it sometimes. However, time constraints make that I have not touched clay since then. Last weekend however, I went to visit the studio where my old teacher  is giving classes nowadays, and where she had an exhibition going on. When she saw me, she said: I have something that is yours... And she went to fetch this little friend of mine, which had been sitting and waiting patiently all that time. I had forgotten all about this sheep and was really surprised and very happy to see it and take it home. It has such a friendly expression on its face!


Today I completed a band weaving project of a pickup pattern from Föllinge. It was the first pickup pattern inkle for me, and the beginning was quite complicated. After a while I found out how to read the pattern and how to pick up and drop threads as per the pattern. It was a bit different from the videos I had watched on rigid heddle band weaving, as the warp threads ly so close in my inkle loom, where the rigid heddle really spreads the warp out so you can se the lowered part of the warp through the lifted part.

The pattern is from a blog by a Swedish woman, publishing some patterns from a collection of patterns from a certain part of Sweden, Jämtland. Föllinge is a village in the western part of Jämtland, not far from the Norwegian border. Hannas website can be found here: hannakristine.se.

Tuesday, 24 February 2015

Stripes / Ränder

Stripes are fascinating. Some of the floorrugs in the house where I am staying are handwoven ragrugs with beautiful stripes.


Ränder är snygga. Här ovan är det några handvävda trasmattor med snygga ränder, vävda av svärmor.

On the internet there is a site where you can generate your own stripes: http://www.biscuitsandjam.com/stripe_maker.php. This wouldn't make a bad ragrug!
På nätet finns en randgenerator, som gjorde ränderna här ovan åt mig, http://www.biscuitsandjam.com/stripe_maker.php. Det skulle kunna bli en trevlig matta!

Sunday, 29 September 2013

Band - ribbons

Nu har det blivit band av bland annat Ouessant fällen. Tillsammans med ett ljusare garn av en annan Ouessant, och vitt gar av ett okänt fårras.
Ena bandet vävdes med vanlig tuskaft, det andra med kort. Längst ner visas det 'vanliga' bandet'

Yes, two ribbons have been woven, with the dark brown Ouessant fleece and also a lighter Ouessant, and a white of unknown breed.
One of the ribbons is woven with an ordinary 'to and fro' technique, the other is made with use of cards. Below the 'ordinary' weaving is shown.