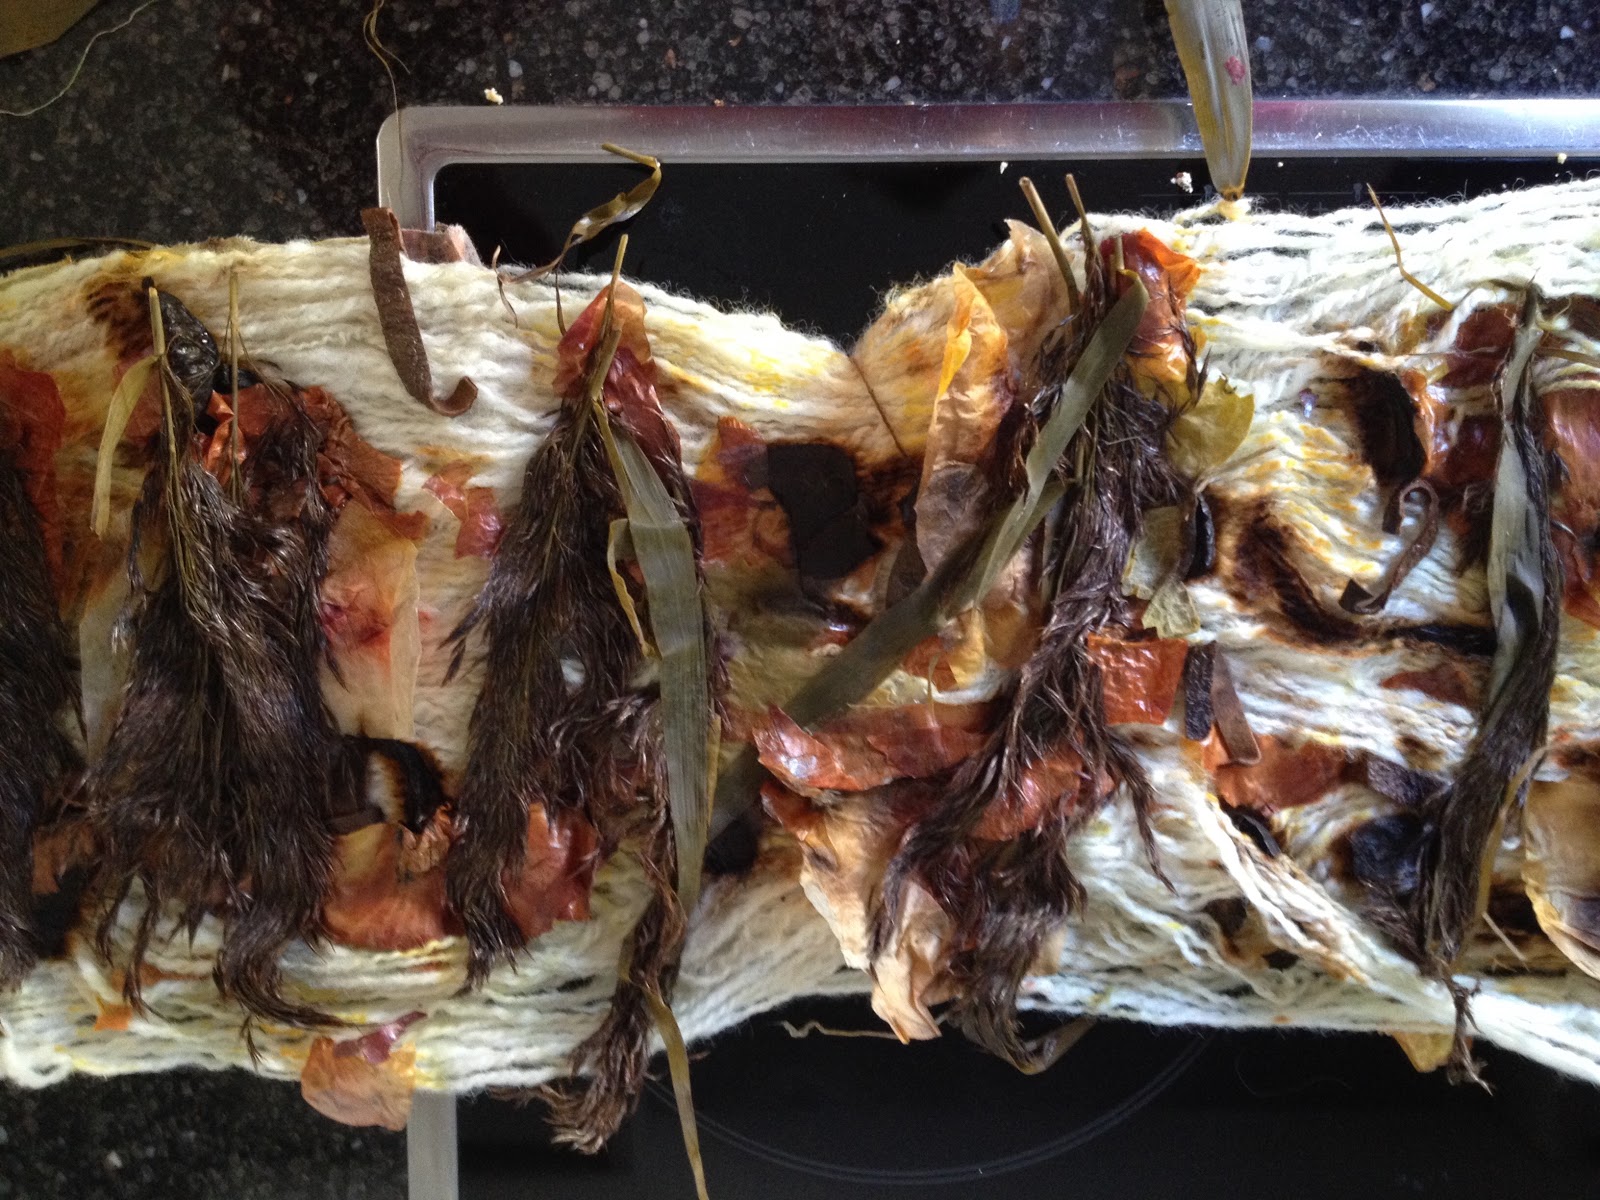
Vandaag hield ik een workshop in het verven van gesponnen garen in een pakketje, zodat het garen allerlei kleuren krijgt van diverse planten in plaats van een egale kleur.
Het was een heel geslaagde dag! Van tevoren had ik goed nagedacht over hoe het zou gaan en wat we nodig hebben, heb ik alles bij elkaar gezocht en voorbereid. Het verliep ongeveer zoals ik gedacht had en de resultaten waren ontzettend leuk! Ik had het alleen zo druk dat ik vergat foto's te maken, maar gelukkig maakte Judith foto's die ik mag gebruiken voor deze blog, dankjewel Judith!
Er hadden zich 8 mensen aangemeld, we kenden elkaar bijna allemaal, leden van de Almeerse Wolunie, en dat maakte het extra gezellig. We begonnen met het in de week te leggen van de garens, en daarna de plantendelen die de kleur zouden geven te verdelen over het garen, met wat stukjes ijzer voor extra kleureffekten. Dat rolden we in een stukje stof wat stevig vastgebonden moest worden. Iedereen maakte prachtige rollades.
Opgehangen aan houte stokjes in een stoombad een uurtje zweten, en daarna weer uitpakken, plantendelen eruit schudden en peuteren, uitspoelen, en voila, ons Monetgaren was geboren! Mocht je met zulk garen willen breien, het is te koop in het Infopunt van de Wolunie.
Showing posts with label garn. Show all posts
Sunday, 15 May 2016
Tuesday, 3 May 2016
Voorjaar op z'n best
Het is heerlijk warm voorjaarsweer. Blauwe luchten met wat wolken.
Nog kale bomen vol knoppen.
En bosanemoontjes die bloeien.
Mijn man en ik zijn in het bos om de berkenboompjes wat uit te dunnen.
Dan ziet hij soms ineens een mooi vogeltje.
Verder ben ik bezig om bollen te wikkelen van mijn Leicester Longwool garen, plantaardig geverfd, om er later een dunne deken van te weven.
Sunday, 6 December 2015
Walnut and heat
This fall I have been dyeing fiber with various dyestuff, all natural, like reed, onion, walnut, birch, madder, indigo and cochineal. This blog post will cover what I did with one single dye pot of walnut extract, and show the results of that.
During my dye-period this fall there was a lot of experimenting, but also a lot of reading. My experience with natural dyeing in earlier years was mainly the 'standard' way of dyeing, and with standard, I mean cooking an extract from a natural dye source (plants), filtering the extract so no plant material is left, pre-mordanting the fibers, and simmering the fibers in the extract at 85-95 deg C for about an hour, rinsing the fibers and let them dry. This fall, on the contrary, I did a lot of reading on the web, and noticed that there are a hundred ways or more to dye wool, which all lead to a result, all nice and some with stronger colors than others.
On the walnut dyeing, I noticed a few differences from the 'standard' dying as I have done before:
(1) No mordant is required. This is actually no new approach, it has been known long time that walnut contains a matter that acts as mordant (tannin), and also in my second hand books from the seventies this information is shared as common knowledge. It was just that I didn't know that yet.
(2) The dye bath can be extracted from the husks without heating the dye pot. Let the sun and time do their work, lower temperatures need more time, but in the end, many report on the web, the walnut dye bath is as good as any 'cooked' dye bath.
(3) The dye bath to dye the fibers does not need heating. The same mechanism of sun and time will result in the same results as when your simmer the fibers a shorter time in the dye pot.
(4) Let the fibers dry after you lift them out of the dye bath before you rinse. This would result in more dye sticking to the fibers than if you rinse immediately after taking them out of the dye bath.
(5) The walnut dye bath can be used many more times than other dye baths (in general, dye baths can be used 2, sometimes 3 times before the color is too weak to be interesting), every time resulting in lighter browns, eventually more towards a greyish brown, but still interesting.
(6) The walnut dye bath can be stored and re-used later on, even if mold has built on the surface. In fact, the mold itself can be left in the dye bath as it also contains dyestuff.
A friend of me kindly gave me two bottles of extracted walnut dye bath, extracted from walnut trees in France which grow around her holiday cottage. The extract was really strong, looking pitch black where it sat in the bottles, almost 3 liters in total. I was very happy to receive this gift! This was the basis for my experimenting. Obviously, I could not apply (2) - no heating to extract the dye as my friend already had done this for me. All the other points, except the last one (storing the bath) I have applied, and in this post I will show you the results. In total, I dyed 5 skeins of varying weights, the heaviest first and last. Four of the skeins are from the same sheep, from the less soft part of the fleece, and I plan to weave with it. The fifth and last skein is from another sheep, spun a bit thicker but the most remarkable difference is that it has more crimp and the yarn therefore is more 'round' than the other four. This is the result
OK, this is what I did, (1) to (5) lay from left to right:
(1) Put the skein in a big glass pot with the cold dye and let it stand in the window (afternoon October sun) for a whole week. Took out the skein and rinsed it (forgot to let it dry first). The color is nice, but I had expected a deep, dark brown. Apparently, just weak October sun is not enough.
(2) Put in next skein in the same pot, and whenever I used my oven to prepare a meal, the pot went into the oven when the food was taken out, and was warmed up in the after warmth to a nice, warm temperature, but not hot. This happened 3 times during the week the skein was in the pot. Then, I took it out, squeezed it and hung it up to dry. After it had dried, I rinsed it. Darker, but still not the deep, dark brown I expected.
(3) Put the dye bath (still very dark brown, almost black) in a pan, put in a skein and simmered for one hour.
(4) Added next skein and simmered for another hour (with the skein from (3) still in it as well). Let it cool until the next morning. Squeezed and hung to dry. Rinsed afterwards.
(5) Put in the last skein, simmered one hour, squeezed, dried, rinsed.
Conclusion: HEAT wins over TIME. The higher and longer the heat, the darker the color, until the dye bath gets exhausted and the last skein gets a more greyish tone than the others. The Octobersun could not compete with the 90 degrees from the stove, but already some mild warmth from the over is better than the windowsill.
Whether drying before rinsing improves the color, I don't know as I did not test both ways, but the colors are nice and dark, so whenever I have the time and opportunity I will apply that method (if I remember).
Saturday, 7 November 2015
Yarn bundling with iron
I have actually used frozen walnut hulls for another dye project. Before they had a chance to thaw and get slimy, I cut them in desired pieces and put them in my yarn bundle, together with onions, a little madder and sandlewood and some rusty screws, spikes and other pieces of iron. I steamed it this time and packed it up when cooled down. A very nice result! The iron made it a lot darker.
Here are the iron parts that I put into the three bundles. The actually stuck to the yarn when unpacking. A Ravelry friend suggested to pack them in thin fabric before putting them in the yarn bundle, which I will try next time.
There were actually three packages, and I was lucky to find a metal steaming device ( well, actually it is not intended for it, but I found it very handy) so now I have tested steaming as well:
And here is another of the bundled yarns:
Saturday, 31 October 2015
Yarn bundling - the knitted results
In my previous post, I showed the resulting yarn of my first attempt at yarn bundling. The colours of the various natural dye stuff are applied very locally on the skein, which gives a vivid colouring in patches spread all over. Now, I knitted up this first skein, and the cuffs and half mittens are lovely. The colours are really autumnal, which I love, warm, and the colours spread about the knitted item as well as in the skein.
Remember my remark that perhaps the skein was a little dry so that the colours only spread minimally. This resulted in yarn with still an amount of white left.
First, I'll show you the cuffs. A very simple pattern to let the yarn colouring show the best:
Next are the fingerless mittens. Usually I knit with thinner yarn, so this time it was a really quick knit. A simple ribbing and stockinette stitch was enough to make the half mitts become beautiful, cosy, practical accessories:
Saturday, 10 October 2015
Bundling - natural dyeing of yarn
Bundling is the name for a technique where one dyes a fabric by wrapping it tight together with dyeplants and heats it or leaves it a few days in a warm place.
I have done the same but with my handspun yarn. You wrap the pre mordanted, moist/wet yarn together with dyeplants in a bundle, heat it (I did it in the microwave but originally you steam it), leave it to cool (I left it 4-5 days in a big glass jar so that it remains humid), unwrap and wash/dry it. This was new to me and I tried it with walnut, onion, reed, some madder and sandelwood.
I used a lot of plant material, on and betreen the strands of yarn, and also, when the bundle was all rolled up, I put an outer layer of reed plumes (is it called reed plumes?) to wrap around.
As I was afraid that small stuff would attach to the yarn and would be difficult to remove, I put the madder and sandlewood in paper teabags, just a little bit in each bag, and laid it out on the skein. But actually everything fell out quite easily afterwards, no onion flakes or walnut peel crumbs were left so there was no need to worry.
The microwave was my idea as I do not have steaming equipment and when dyeing with acid dyes one can use the microwave: 3 minutes on (max effect), 7 minutes rest, and this sequence repeated 3 times, so 30 minutes in total.
I found that the dried plant materials soaked up quite a lot of moisture that was in the yarn, and thought that, next time, either the yarn must contain more water when starting, or steaming would be better. With a little more moisture, I believe that the colour spreads a little bit wider away from the plant material. So now I found a metal sieve at a thrift store and plan to steam for the next experiment. Steaming would be done for an hour or so.
An advantage of steaming above the microwave is also that you can add some rusty parts, to do after-treatment with iron to influence colour. Yellow from onions turns green with iron. I would not dare to put skrews and bolts in the microwave, but one can include some in the bundle when steaming.
I also believe that the result is so striking because of the dark brown from the walnuts. They are really super for this method! My walnuts are gone but for next year I am already thinking to put some in the freezer. So if you still have access to walnut shells, and want to do this bundling somewhat later in the year, e.g. with spring or summer plants, put some aside!
Here you see how I put all the dye stuff in the skein and wrap it. You can also see that the whole package is wrapped in reed plumes at the outside.
This is how it looked when I unwrapped it.
And with all the plant material removed, before and after washing. You still see the spots in the skein where the various dyestuff was wrapped, especially the walnut!
And lastly, when re-skeined into a fresh skein.
Wednesday, 1 April 2015
Broderade muddar - Embroidered cuffs
Hej igen,
English below.
Det har varit en fasansfull storm under 1,5 dygn. Igår blåste taket från ett flervåningshus, välte en lastbil på motorvägen, och blåste fönstret in hos min man på jobbet i det nya fina kontoret de flyttade till i höstas. Tåget var ur funktion på många sträckor, men lyckligtvis inte på 'min' sträcka mellan jobb och hem.
Just nu skiner vårsolen, och det ser nästan ut som om vädret/naturen säger: Vem? Jag? Nää, jag har inte gjort något!
Under tiden stickar jag vidare, det är fler muddar som blev klara, redan för ett tag sedan, denna gång med broderi på, vilket är nytt för mig, men så roligt.
Första paret är gjort med restgarn. Garnet är inte restgarn 'som blev över efter ett stickproject', nej, det är gjort på rest-singlar, entrådiga bitar som blev över efter tvinnandet när det andra entrådiga tog slut. Dessa entrådiga snuttar, ibland rätt mycket, spar jag på tre udda spolar och när det finns tillräckligt så blir det ett finfint tretrådigt garn.
Det är stickat med 'linnestickning', linen stitch på engelska, och broderiet är gjort med ett rosafärgad gotlandsgarn som också donerade en bit till det tretrådiga garnet (kan ni se det?). För övrigt finns en härlig mix av ullsorter i garnet: gotland, dorset, blå texel, leicester longwool, värmlandsfår mm.
Det andra paret är stickat på gotlandsgarn, i storlek jättestor. Sedan är muddarna tvättade i tvättmaskinen för att filta sig. Avigsidan blev snyggare än rätsidan så den fick bli finsidan, som det blev broderi med Isländsk tema på. Isländska magiska tecken, där den nedersta ska målas på en trätunna och skyddar mot läckage, den valde jag mest för formen, och den översta bringar bäraren tur i handel och affärer. Broderigarnet är tunnt kamgarn på Leicester Longwool.
English. Two pairs of cuffs, knitted of my handspun, both with embroidery, which is new to me. Well, embroidery isn't new, but I haven't done it on knitted items yet. Such fun!
The first pair is knitted in linen stitch. It is an easy knitting stitch which you can find instructions on the tube, simply knit 1, lift 1 with yarn in front, repeat. Make sure you have an uneven number of stitches. The yarn is spun from singles which were left over after plying, stored on three spare bobbins and plied together when full. The embroidery is mainly done with a pink gotlandyarn of which a single is in the knitting yarn as well. The pattern is a fantasy pattern.
The other cuffs are knitted and then felted in the washing machine. The purlside was nicer so that became the outside. The embroidery is done with a combed and worsted spun Leicester Longwool. The signs are old Icelandic magical signs. The lower one was usually put on a wooden barrel to prevent it from leaking, and the upper one brings the bearer good fortune in commerce and business.
Saturday, 28 March 2015
Skudde garn/yarn
Skudde är en fårras som härstammar från öst Preussen, Litauwen och Schweiz. Nuförtiden finns smågrupper Skudde i Tyskland och Nederländerna, och också i andra länder men det finns inte många.
Min Skudde ull är från en liten grupp får i Nederländerna som hålls för att ägaren skall kunna träna sina vallhundar, Skudde får är snabba och håller bra ihop så därför är det bra träningsfår. De är enkla att hålla, kräver inte mycket skydd, kan vara ute hela vintern och är inte kräsna med maten. De används ofta som landskapsvårdare.
När jag fick fällen blev jag förskräckt över hur mycket märghår det fanns, korta, svarta, stickiga hår som i och för sig kunde plockas ut lätt men eftersom det fanns så mycket så var det ändå ingen ide att försöka. Den hade inte så mycket, gråbrunt, täckhår och otroligt mjuk underull i en vacker ljusgrå färg. Ullen har legat nästan ett år, jag fick den i Maj 2014, tvättade den och visste sedan inte vad jag skulle göra med den. Men nu har jag tagit fram en del, kardade den ik kardmaskinen till rullar (4 rullar per kardflor), och spann ett löst spunnet tvåtrådigt garn. Det blev trevligt, mycket luftigt av den mjuka underullen. Härvan på bild är spunnen av 2 lätta kardflor, straks under 50 gram. Märghåren finns, så det begränsar användningsområdet, men jag ser en liten stickad väska med axelrem av ullen famför mig.
English. Skudde is a rare breed of sheep with its origin on the east Preussian region, Lithuania and Switzerland. Nowadays there are small groups of these sheep in Germany and the Netherlands, as well as in other countries but their are not many of them.
My Skudde fleece is from the Netherlands, of a small group of sheep that is kept to train the sheepdogs of the owners. They are active, quick sheep to train with. They are easy, low maintenance sheep, hardy and not picky in the food they eat. Often they are kept for maintenance of an open landscape.
The fleece contains a lot of brittle kemp, så much that it is impossible to remove, e.g. by combing. The outer hair is grey and brown, the wool part is so soft and of a beautiful light grey. I drumcarded part of it in two thin cardfleeces, parted each in 4 rolags and spun a low twist two-ply yarn. Actually quite beautiful. The kemp is making usage for garments a bit difficult but I see a small bag with long shoulderband as apossibility.
Wednesday, 25 March 2015
Sittdynor - Sitting pad
För bra länge sedan spann jag några rejäla garn. Ett grått och ett svart gotlandsgarn och ett vitt från Veluws Heideschaap. Det sista garnet är från en gammal holländsk ras som brukade användas att beta på ofruktsam hedelandskap. Fåren samlades på natten och deras spillning togs tillvara för att göda åkrarna. Fåren har alltså aldrig selekterats på ullkvaliten och ullen är full av märghår. Det sticks men framförallt kommer dessa hår alltid att fällas ur vad man än gör med garnet. Så det skulle användas till något oömt och där det inte gör något att vita hårda hårstrån faller ut.
Det blev en sittdyna. Stickat med ett mönster ur en stickbok och filtad i tvättmaskin.
English. A long time ago I spun yarn from Veluws Heideschaap, an ancient Dutch breed that was kept to graze on unfertile soil and to stay in a barn overnight so that their manure could be gathered and used as fertilizer on the farmers fields. The sheep were never bred for the wool and their fleece is full of kemp. This kemp will fall out of anything made with it, slowly and unstoppable. So if you don't want white brittle hairs everywher on your clothes or on the sofa, you cannot knit garments or a pillowcase of it. I decided to make a sitting pad which I felted in the washing machine. This was the result and I like it very much. So does my husband who uses it when he has to work in a very chilly office every week.
Mönstret blev något suddigt men jag blev mycket nöjd med resultatet. Min man använder den när han skall sitta och arbeta på ett kallt kontor, som händer en dag i veckan och han är också jättenöjd.
Jag fick mera ull från Veluws Heideschaap och har nu garn till ytterligare en sittdyna. Så den stickar jag på nu. Mönstret och övergångarna i färg är lite bättre planerade och jag ser fram emot att vi får var sin sittdyna, som vi kan ha när vi är på utflykt, i trädgårdsstolarna eller helt enkelt hemma på köksstolarna.
English. I received more Veluws Heideschaap, spun another thick yarn and started knitting another one. Unfortunately I don't recall the exact thickness of the yarn, nor the needle size used. A miracle has to happen in the washing machine to end up with two sitting pads of similar size.
Jag minns inte riktigt vilken stickstorlek jag använde och det kan hända att garnet inte har samma tjocklek, det sparade jag inte och är svårt att se på ett filtat objekt. Men det måste hända ett under i tvättmaskinen om dessa två skall bli lika stora.
Wednesday, 25 February 2015
Muddar och torgvantar
Två saker blev klara denna vecka. Båda skall bli presenter som tack för en gåva, fast det återstår att se om de passar mottagarna.
Monicas Torvantar, efter ett mönster gjort till mig av Ravelry-vännen Monica, är gjorda av tre-trådigt Garn av Dorset ull. De blev mycket fina tycker jag själv, och det går allt lättare att sticka flätorna utan hjälpsticka, till och med utan att titta på beskrivningen hela tiden.
Jag fick en gammal Louet S10 spinnrock av kvinnan som skall få dessa. Tyvärr tror jag att hon har mycket större händer än jag, och dessa torgvantar passar mig utmärkt...
Two items are completed this week, both to be gifted to someone as a thank-you for a gift received from them. It is, at least for the half-mittens, yet unclear whether they will fit.
Monicas market-mittens, a pattern made for me by a Ravelry friend (Monica), are knitted of tree-plied brown Dorset, spun on my Louet Victorie. They are quite nice, if I may say so, and the cable-knitting is getting better all the time. These cables, on 3 and 2 stitches, are made without an extra cable needle, and I even managed to knit them without looking at the instructions continuously.
The receiver of the half mittens gave me her old Louet S10 spinning wheel, and unfortunately I believe she gas much broader hands than me, and the half mittens fit me perfectly...
De röd-gråa muddarna är stickade efter ett Estniskt mönster ur boken Ornamental Journey av Kristi Joeste och Kristiina Ehin, en mycket vacker bok med många bilder på otroligt tjusiga stickade och broderade handskar och vantar, berättelser, inspiration och stickinstruktioner. Boken kan jag rekommendera varmt!
Garnet spann jag av en fäll blå texel. Det röda var färgad som kardflor, med krapprot. Eftersom den här blå texel, som brukar vara grå till svart, var av en mycket ljus sort, så blev den röda färgen ganska klar.
Mottagaren är bonden som gav mig den här ullen, från sina texel får.
The red and grey cuffs are inspired by an Estonian knitting pattern for the cuffs of a pair of mittens, described in the book ' Ornamental Journey' by Kristi Joeste and Krisiina Ehin. A beautiful book full of pictures of stunning knitted and ornamental mittens, stories, inspiration and instructions. I can really recommend the book.
The yarn is spun of a blue texel fleece, the red is dyed with madder. This fleece was exceptionally light grey, normally blue texel is much darker. On this light grey, the madder dye takes beautifully.
The farmer who gave me this fleece will receive the cuffs.
Sunday, 18 January 2015
How we spin
English
It is very interesting to see that, though there is a common knowledge about techniques and the names used for these techniques (short forward draw, long draw etc), every spinner has a very individual style. Last week, at the gathering of our spinning group, I tried to capture this in a little film. All spinners show, in a little more than half a minute, their way of spinning at that moment. It results in a very interesting and diverse 7 minutes.
The wool that is spun, the preparation of the wool and the spinning wheels used vary, as you will see. There is Shetland wool, Bleu du Maine, Blue Texel, Alpaca, Dutch Bont Schaap with Silk, 'White' wool and 'Brown' wool. The preparations vary from commercially combed and dyed top, to rolags, drumcarded fleece and washed and raw wool. Main technique used is short draw. Look for yourself and enjoy:
Nederlands
Het is ontzettend interessant om the zien dat, hoewel er algemeen bekende termen zijn voor de technieken van het spinnen, iedere spinner een eigen stijl heeft, ook al wordt volgens dezelfde techniek gesponnen. Afgelopen week heb ik tijdens de bijeenkomst van onze spingroep dit proberen vast te leggen in een filmpje, waarin iedere spinner in ruim een halve minuut de eigen manier van spinnen (van dat moment) laat zien. Het resultaat is een boeiende 7 minuten durende film.
De wol die gesponnen werd, de preparatie van de wol en de spinnewielen die zijn gebruikt varieren, zoals je zult zien. Er is gesponnen met Shetland wol, Bleu du Maine, Blauwe Texelaar, Alpaca, Hollands Bont schaap met Zijde, 'Witte' wol en 'Bruine' wol. De preparatie van de wol varieert van commercieel gekamde en geverfde kaardlont, rolags, kaardvliezen tot gewassen en ruwe vacht. De meest gebruikte techniek is 'short draw'. Kijk en geniet.
Svenska
Det är riktigt intressant att se att, fast det finns allmänna termer för de vanligaste spinntekniker, varje spinnare har en egen stil. Förra veckan har jag försökt att kartlägga variationerna i vår spinngrupp i en liten film. Varje spinnare visar i drygt en halv minut dess egen still för det tillfället. Det resulterar i en intressant film på 7 minuter.
Ullen som spinns, ullprepareringen och spinnrockarna som användes varierar som du kan se. Det har spunnits med Shetland, Bleu du Maine, Blå Texel, Alpaca, Holländsk Bont får med silke, ´Vit´ ull och 'Brun' ull. Prepareringen varierar från kommersiell färgad kardband, kardade rolags, kardflor till tvättad och rå ull. Den mest använda tekniken är korta drag. Titta och njut.
Labels:
Får,
garn,
spinna,
ull,
Wol en Wiel
Thursday, 1 January 2015
Spinnarplaner 2015
Gott Nytt År! Happy New Year! Gelukkig Nieuw Jaar!
Fyrverkeridimmorna har lagt sig (det var en kortare tid man fick tända fyrverkeri här och det verkar att man höll sig till detta men brände upp lika mycket som andra år: det blev ett himla intensivt knallande runt 12-slaget). Så nu är det dags för en liten summering av 2014 och lite planläggning för 2015. Eller ett försök till planläggning iallafall.
En snabb titt tillbaka till början av 2014 visade vilka planer jag hade, så nu ser jag vilka av det som blivit förverkligade. Planerna var att ta hand om en massa fällar: av Finull (har tvättad båda två, kardat den ena men spunnit nästan inget av dem), Gotland (har sorterat men inte tvättat), Gotland-Dorset korsning (har tvättat och kardat, spunnit en del och färgat en del) och Romney (har spunnit upp den, det blev delvis vitt garn men det mesta är syrafärgat i olika färger).
Sedan hoppades jag på en spinnträff med några Ravelry kompisar på sommaren och det har blivit av, tack för det!
Väva band ville jag göra och mycket riktigt skaffade jag en bandvävstol och det blev 2 fina band. En ser ni här, vävd av handspunnen Leicester Longwool:
Sticka tröjor har jag gjort (2koftor och en tröja) men det var ingen succe med passformen. Så nu deltar jag i Dödergöks Uppifrån och ner koftKAL så att det äntligen blir någon tröja/kofta som är användbar. Och växtfärga ville jag göra, det blev hundkex, vassvippor, lökskal och krapprot, fina färger allihopa!
Det jag också har gjort och som inte var planerat, är att ge en spinnkurs! Under 3 kvällar har jag och en spinnkompis lärt ut spinnandets baskunskaper till 10 intresserade kvinnor, och det var otroligt roligt och stimulerande. En gång i månaden är jag värdinna för en spinnträff hos vår ullförening, så förhoppningsvis kommer det en del av dessa elever till träffarna när de sätter igång igen detta år.
Under året blev jag med fler fällar (bl.a. Blå Texel, Dorset och Leicester Longwool) och det har känts som skrämmande mycket: jag har ansträngt mig att inte ta emot fällar av sorter som jag redan har eller har spunnit. Det lyckades men än så finns det spinnmaterial här hemma! Det vill jag jobba på.
Av en Ravelrykompis fick jag underbar norsk ull som jag längtar till att få börja med, jag vill absolut pröva den denna vår!
Nya utmaningar för 2015 blir att spinna silke. Och så vill jag spinna mera boucle garn.
Det här året skall jag återigen börja notera det som blir spunnit i en excel ark, det är praktiskt och faktiskt kul.
Och så hoppas jag på en spinnträff med några Ravelry spinnkompisar igen under sommaren! För att spinna tillsammans är nästan det roligaste som finns!
Wednesday, 26 November 2014
Garnval för koftKAL
Innan jag kan sticka provlapp(ar) måste jag välja garn, ett eller några alternativ. Jag har ett garn som var enormt kul att göra, både färgning och spinnande, men som är lite knepigt att använda. Det är nämligen självrandande och spräckligt:
Det är 440 gram, och borde räcka. Tidigare stickade jag en kofta i finull och den väger 360 gram och har aningen tjockare garn. Nu vill jag göra den här koftan lite större, och skulle det mot förmodan inte räcka får jag spinna mera brunt garn, eller övergå till annan randning sådär 2/3 delar nere i koftans bål och ärmar.
Jag gjorde garnet några år tillbaka, genom att färga små mängder vit finull i olika grön-gul-oranga färger och kombinera det i spinnandet med brun finull. Ena singeln är växelvis brunt och nån av grönfärgerna medan den andra singeln är brun (för det mesta). De färgade partierna blir alltså spräckliga.
Tidigare gjorde jag en mössa i garnet, och ett par vantar. Mössan, en basker, blev så här:
Sunday, 16 March 2014
Breirol, Knitting Roll or Stick Rulle
The Knitting Roll is finished! Here is a picture of the whole shawl (in two parts) showing all used knitting patterns:
The patterns come, from top to bottom, from the following sources:
1, 2 and 3 are a combination of knitting in rib, knitting 3 together and wrapping yarn around the needle, all three practically identical but with a different number of normal rows in between (the pattern row is knit every 8, 4 and 2 rows respectively). These I have learned from a member in my spinning group.
4 and 5 are alternating holes made by yarn wraps and knitting together, but this time the holes are not straight above each other but alternating. Also these are taught to me by the same member of the spinning group.
6 (second picture) is derived from an old knitting book containing only knitting patterns. No author is mentioned in the book and the name of the pattern is something like Rhomb-ribbing.
7 and 8 are mentioned as old knitting patterns and are explained in a book about knitting with Gotland wool, 'Ekoull och Gotländsk sticksöm' by Ulla Persson and Kicki Trodin. Kråkspark and Björklöv (birchleave) are the names of the patterns.
8 is from the same book as number 6 and is called Korenaar (´Ear of corn´ according to the on-line translator).
9 is the last pattern, again from the member of the spinning group. This pattern has the lace holes running in diagonals between vertical bars.
After this pattern I ran out of yarn, as the yarn is handspun by me of a Dorset sheep, there is no more to be obtained of the same kind so I bound of.
Now I will give the shawl to a dear friend who has said that she adores lace and loves this shawl.
Monday, 27 January 2014
Stickmönster
Förr i tiden fick man lära sig att sticka av mamma eller mormor. Stickmönster skulle man lära sig och sedan komma ihåg, eftersom det inte fanns mönsterböcker ännu. Som hjälp för att komma ihåg olika mönster gjordes dessa 'stickrullar', i alla fall i Nederländerna. 'Breirol' kallas de. En lång sjal med olika mönster, som förvarades upprullade på en papprulle. Då kunde stickerskan titta på den ibland när hon ville få fram ett nytt mönster i en sjal, tröja eller annat hon ville sticka.
Det blir många hål på olika sätt, som bildar olika mönster. Varje mönster skiljs åt med 4 rader rätstickning, i bilden ovan ser ni att tredje mönstret har precis blivit påbörjat. När den här är färdig kommer den inte att ligga upprullad på en papprulle, det skulle vara tråkigt att stoppa undan något så fint.
Garnet är ganska tunn två-trådig Dorset ull, från får i Småland, från gården Vadet för att vara precis. Det var vinterull och den var hur smutsig som helst och ganska kort. Inte idealiskt alltså men det blev en fin tråd av det i alla fall! Den är spunnen på min Louet Victoria.
Wednesday, 16 October 2013
Colors!
Since summer, when there was time, I spun small skeins of a lovely type of wool, long shiny curls, which, combed on mini combes and spun right of the combes, resultet in shiny miniskeins of white yarn. The length was each time something around 65-75 meters, perfect to have in storage for band-weaving.
Lately, the dyeing pot has been on the stove, to dye the skeins, one after the othe, in a relaxed and steady rythm. Dye a skein in the evening, let it cool down over night, and take it out of the pot the next evening. If there was time, the same procedure would be repeated that night, but if not- no problem, it was possible to wait for the next opportunity. And see here, what a lovely set of colors!
The upper yellow is dyed with onion peels, the others are dyed with acid dyes, that I mixed myself from red, yellow and blue. My experience is that the most beautiful colors are obtained when all three basic colors are used.
To the right, natural colors are shown, the 2 browns from Oessant sheep, the white from the same locks as the colored skeins. I really wish I knew what kind of sheep gave these curls!
Coming weeks, they will be transformed into some nice ribbons again, if and when the ribbon loom is available.
Sunday, 29 September 2013
Band - ribbons
Nu har det blivit band av bland annat Ouessant fällen. Tillsammans med ett ljusare garn av en annan Ouessant, och vitt gar av ett okänt fårras.
Ena bandet vävdes med vanlig tuskaft, det andra med kort. Längst ner visas det 'vanliga' bandet'
Yes, two ribbons have been woven, with the dark brown Ouessant fleece and also a lighter Ouessant, and a white of unknown breed.
One of the ribbons is woven with an ordinary 'to and fro' technique, the other is made with use of cards. Below the 'ordinary' weaving is shown.
Wednesday, 20 June 2012
Små tossor
Ullen kändes för kort för att kunna göra ett hållbart garn, och den ljusa färgen var för fin för att kasta ullen. Så då blev valet lätt att använda den till att filta tofflor, något som jag har velat göra länge. Det blev små bebistofflor, till en nästan ett-åring.
Först stickade jag ett par jättetofflor:
Sedan kastes de in i tvättmaskinen och då kom det ut stadiga små lurviga tossar. Hoppas att lillen blir glad!
Nya vantar
Det hände något tragiskt med mina nya tvåändsstickade vantar bara någon vecka efter att de blev färdiga: jag tappade bort dem!
Letande och efterfrågningar till trots så förblev de borta. Då var det bäst att sticka ett par till! Det tar en evighet och därför blev de färdiga nu i juni, så jag kan ha dem kommande vinter.
Labels:
garn,
spinna,
sticka,
Tvåändsstickning,
vantar
Sunday, 5 July 2009
Garn på tork

I påsar och säckar låg redan några härvor garn, färdigspunnen och tvinnade, men inte tvättade ännu. Nu har jag tagit tid, fått hjälp med att ordna torkställe, och se, 5 prydliga härvor garn som ska torka i sommarvärmen.
Subscribe to:
Posts (Atom)