Showing posts with label Färgning. Show all posts

Thursday, 16 February 2017

Een heerlijke dag / A lovely day

Gisteren was een stralende dag. Man en dochter gingen snowboarden, dus ik had al vroeg in de ochtend het huis voor mezelf. In de ochtend gekaarde Romneywol van een schaap van de Almeerse Wolunie met blauwhout geverfd. Twee baden, het eerste met 20% voorgeweekt blauwhout, een uurtje warm gehouden en daarna er uit gehaald en gespoeld. Er waren heel veel spoelbaden nodig voordat het spoelwater niet meer donkerpaars kleurde. Mijn handen en vooral nagels waren dieppaars. De tweede portie gekaarde wol heb ik erin gelegd, gedurende de dag warm gehouden (het stond op een hoekje van het houtfornuis wat aan was vanwege de kou) en in de nacht laten afkoelen. De volgende ochtend gespoeld en de kleur was iets minder dieppaars maar toch lang niet gek!
Wat wel gek is, is dat ik er geen foto’s van heb gemaakt. Als ik zo druk bezig ben met iets vergeet ik de vastlegging.

Yesterday was a perfect day. Husband and daughter were away snowboarding so the house was all mine already early in the morning. In the morning i dyed carded Romney wool with logwood. I prepared a 20% logwood to wool dyebath, already in a hot bath the evening before, to extract the colour. The first portion carded fleece was in the ’hot but not boiling’ bath for an hour. The second bath was held hot during the day and cooled during the night. The first card fleece was a deep purple and so were my hands from the rinsing. Many rinses were neede before the water was so clear that I could see the bottom of the sink. The second card fleece was lighter, but not bad at all either.

There are no pictures as I copletely forgot to take any when I was busy with the dyestuff.

In de middag was ik buiten, de zon straalde en het was windstil en aangenaam. De zwarte bessenstruiken kregen een flinke snoeibeurt, en ook de vogelkers kreeg een snoeibeurt. De bessenstruken groeien dicht op elkaar dus ik heb voornamelijk takken tot de grond toe verwijderd. Op het juiste moment in het jaar zal ik de takken die blijven een keer goed inkorten, maar er zaten al zoveel knoppen in, en ik wist niet goed waar de bessen aankomen, dus de toppen heb ik maar gelaten. De vogelkers had veel uitschieters die bij de stam uit de grond schoten. Behoorlijk dikke takken al, dus die heb ik weggezaagd. Aan de voet van de stam was ook een holletje van een dietrje. Je zag dat de ingang druk gebruikt werd, de grond was er kaal. Ik hoop maar dat-ie niet heel erg schrikt als hij weer naar buiten komt en ziet dat er van alles weg is.

In the afternoon it was time to cut down some black currant branches. There were already lots of buds, so I left the tops of the remaining branches. Also another bush was cleaned at the base from all branches that grew from the main trunk close to the ground.

En daarna was het tijd voor thee en een uurtje breien in de zon! En voor foto’s. Wat was het heerlijk.
Mijn bankje / the bench

Uitzicht naar links / view to the left

Uitzicht naar voren / view in the front

Uitzicht naar rechts / view to the right

Heerlijk! Lovely!

Saturday, 21 May 2016

Verfplantentuin

IVN Almere en de Almeerse Wolunie hebben gezamelijk een verfplantentuin opgezet en beheren die nu al een tijd. Ik heb veel enthousiaste verhalen gehoord, heb zelfs al eens met het boerenwormkruid van de akker geverfd, maar ben er, tot vandaag, nog nooit geweest (beschamend, ja, maar nu dus rechtgezet!).
Margrieten vooral voor het ecoprinten
 Vandaag was de officiele ingebruikname van de waterpomp bij de verfplantentuin. Vorig seizoen zijn er spierballen gekweekt en vele natte voeten gehaald door het heen en weer rijden van een kruiwagen met water vanaf de dierenweide naar de akker, maar dit jaar, eerder in het voorjaar, is er een waterpomp geplaatst. Dit helpt de verzorgers van de akker enorm!

De opening werd verricht door een aantal enthousiaste vrijwilligers van de akker, door gezamelijk water te pompen, maar eerst was er nog een speech van de voorzitter van de Wolunie, van een (oud-) vertegenwoordiger van het fonds wat geld geschonken heeft voor de pomp en van de Wolmeester.
Jan vertellend over de behoefte aan en de komst van de waterpomp

Allemaal korte en gezellige praatjes, dus heel leuk leerzaam en insprirerend om naar te luisteren! De Wolmeester bood kleine 'schilderijtjes' aan aan de vrijwilligers van de akker, met wollen draadjes en vilt wat plantaardig geverfd was met planten van de akker.


Irma was er natuurlijk, de motor en inspirator van de verfplantentuin. Hier zie je haar trots voor de prachtige planten die de Wolunie voorzien van kleurrijke wol.


Ik ben diep onder de indruk van de tuin. Wat een veelvoud aan planten, en ze staan er zo gezond bij! De meeste plantenrijen zijn voorzien van een informatiebordje, voor de nieuwsgierige voorbijganger. Het was ook prachtig weer om door de tuin te lopen en te genieten van alles wat groeide. Ad, die vanuit het bestuur van de Wolunie de coordinatie van de akker doet, gaf een rondleiding langs alle planten en vertelde kort van de strubbelingen en successen van iedere plantensoort, zeer leuk om te horen.

Het informatiebordje van Wede, vroeger de enige plant die in Europa blauw leverde, voordat Indigo geimporteerd werd.


En van Wouw, wat een lichtbestendige gele kleur geeft.
Meekrap in het echt, het schijnt een best brede plant te worden, met natuurlijk een groot wortelstelsel, wat uiteindelijk voor de rode verfstof gaat zorgen
Wat krijg ik hier weer zin in het plantaardig verven van. Maar eerst nog aan de studie!

Sunday, 15 May 2016

Monetgaren

Vandaag hield ik een workshop in het verven van gesponnen garen in een pakketje, zodat het garen allerlei kleuren krijgt van diverse planten in plaats van een egale kleur.

Het was een heel geslaagde dag! Van tevoren had ik goed nagedacht over hoe het zou gaan en wat we nodig hebben, heb ik alles bij elkaar gezocht en voorbereid. Het verliep ongeveer zoals ik gedacht had en de resultaten waren ontzettend leuk! Ik had het alleen zo druk dat ik vergat foto's te maken, maar gelukkig maakte Judith foto's die ik mag gebruiken voor deze blog, dankjewel Judith!


Er hadden zich 8 mensen aangemeld, we kenden elkaar bijna allemaal, leden van de Almeerse Wolunie, en dat maakte het extra gezellig. We begonnen met het in de week te leggen van de garens, en daarna de plantendelen die de kleur zouden geven te verdelen over het garen, met wat stukjes ijzer voor extra kleureffekten. Dat rolden we in een stukje stof wat stevig vastgebonden moest worden. Iedereen maakte prachtige rollades.


Opgehangen aan houte stokjes in een stoombad een uurtje zweten, en daarna weer uitpakken, plantendelen eruit schudden en peuteren, uitspoelen, en voila, ons Monetgaren was geboren! Mocht je met zulk garen willen breien, het is te koop in het Infopunt van de Wolunie.


Sunday, 6 December 2015

Walnut and heat

This fall I have been dyeing fiber with various dyestuff, all natural, like reed, onion, walnut, birch, madder, indigo and cochineal. This blog post will cover what I did with one single dye pot of walnut extract, and show the results of that.

During my dye-period this fall there was a lot of experimenting, but also a lot of reading. My experience with natural dyeing in earlier years was mainly the 'standard' way of dyeing, and with standard, I mean cooking an extract from a natural dye source (plants), filtering the extract so no plant material is left, pre-mordanting the fibers, and simmering the fibers in the extract at 85-95 deg C for about an hour, rinsing the fibers and let them dry. This fall, on the contrary, I did a lot of reading on the web, and noticed that there are a hundred ways or more to dye wool, which all lead to a result, all nice and some with stronger colors than others.

On the walnut dyeing, I noticed a few differences from the 'standard' dying as I have done before:
(1) No mordant is required. This is actually no new approach, it has been known long time that walnut contains a matter that acts as mordant (tannin), and also in my second hand books from the seventies this information is shared as common knowledge. It was just that I didn't know that yet.
(2) The dye bath can be extracted from the husks without heating the dye pot. Let the sun and time do their work, lower temperatures need more time, but in the end, many report on the web, the walnut dye bath is as good as any 'cooked' dye bath.
(3) The dye bath to dye the fibers does not need heating. The same mechanism of sun and time will result in the same results as when your simmer the fibers a shorter time in the dye pot.
(4) Let the fibers dry after you lift them out of the dye bath before you rinse. This would result in more dye sticking to the fibers than if you rinse immediately after taking them out of the dye bath.
(5) The walnut dye bath can be used many more times than other dye baths (in general, dye baths can be used 2, sometimes 3 times before the color is too weak to be interesting), every time resulting in lighter browns, eventually more towards a greyish brown, but still interesting.
(6) The walnut dye bath can be stored and re-used later on, even if mold has built on the surface. In fact, the mold itself can be left in the dye bath as it also contains dyestuff.

A friend of me kindly gave me two bottles of extracted walnut dye bath, extracted from walnut trees in France which grow around her holiday cottage. The extract was really strong, looking pitch black where it sat in the bottles, almost 3 liters in total. I was very happy to receive this gift! This was the basis for my experimenting. Obviously, I could not apply (2) - no heating to extract the dye as my friend already had done this for me. All the other points, except the last one (storing the bath) I have applied, and in this post I will show you the results. In total, I dyed 5 skeins of varying weights, the heaviest first and last. Four of the skeins are from the same sheep, from the less soft part of the fleece, and I plan to weave with it. The fifth and last skein is from another sheep, spun a bit thicker but the most remarkable difference is that it has more crimp and the yarn therefore is more 'round' than the other four. This is the result

OK, this is what I did, (1) to (5) lay from left to right:
(1) Put the skein in a big glass pot with the cold dye and let it stand in the window (afternoon October sun) for a whole week. Took out the skein and rinsed it (forgot to let it dry first). The color is nice, but I had expected a deep, dark brown. Apparently, just weak October sun is not enough.
 (2) Put in next skein in the same pot, and whenever I used my oven to prepare a meal, the pot went into the oven when the food was taken out, and was warmed up in the after warmth to a nice, warm temperature, but not hot. This happened 3 times during the week the skein was in the pot. Then, I took it out, squeezed it and hung it up to dry. After it had dried, I rinsed it. Darker, but still not the deep, dark brown I expected.
(3) Put the dye bath (still very dark brown, almost black) in a pan, put in a skein and simmered for one hour.
(4) Added next skein and simmered for another hour (with the skein from (3) still in it as well). Let it cool until the next morning. Squeezed and hung to dry. Rinsed afterwards.
(5) Put in the last skein, simmered one hour, squeezed, dried, rinsed.

Conclusion: HEAT wins over TIME. The higher and longer the heat, the darker the color, until the dye bath gets exhausted and the last skein gets a more greyish tone than the others. The Octobersun could not compete with the 90 degrees from the stove, but already some mild warmth from the over is better than the windowsill.

Whether drying before rinsing improves the color, I don't know as I did not test both ways, but the colors are nice and dark, so whenever I have the time and opportunity I will apply that method (if I remember).

Saturday, 7 November 2015

Yarn bundling with iron

I have actually used frozen walnut hulls for another dye project. Before they had a chance to thaw and get slimy, I cut them in desired pieces and put them in my yarn bundle, together with onions, a little madder and sandlewood and some rusty screws, spikes and other pieces of iron. I steamed it this time and packed it up when cooled down. A very nice result! The iron made it a lot darker.
Here are the iron parts that I put into the three bundles. The actually stuck to the yarn when unpacking. A Ravelry friend suggested to pack them in thin fabric before putting them in the yarn bundle, which I will try next time.

There were actually three packages, and I was lucky to find a metal steaming device ( well, actually it is not intended for it, but I found it very handy) so now I have tested steaming as well:

And here is another of the bundled yarns:

Saturday, 31 October 2015

Yarn bundling - the knitted results

In my previous post, I showed the resulting yarn of my first attempt at yarn bundling. The colours of the various natural dye stuff are applied very locally on the skein, which gives a vivid colouring in patches spread all over. Now, I knitted up this first skein, and the cuffs and half mittens are lovely. The colours are really autumnal, which I love, warm, and the colours spread about the knitted item as well as in the skein. Remember my remark that perhaps the skein was a little dry so that the colours only spread minimally. This resulted in yarn with still an amount of white left. First, I'll show you the cuffs. A very simple pattern to let the yarn colouring show the best:
Next are the fingerless mittens. Usually I knit with thinner yarn, so this time it was a really quick knit. A simple ribbing and stockinette stitch was enough to make the half mitts become beautiful, cosy, practical accessories:

Saturday, 10 October 2015

Bundling - natural dyeing of yarn

Bundling is the name for a technique where one dyes a fabric by wrapping it tight together with dyeplants and heats it or leaves it a few days in a warm place.


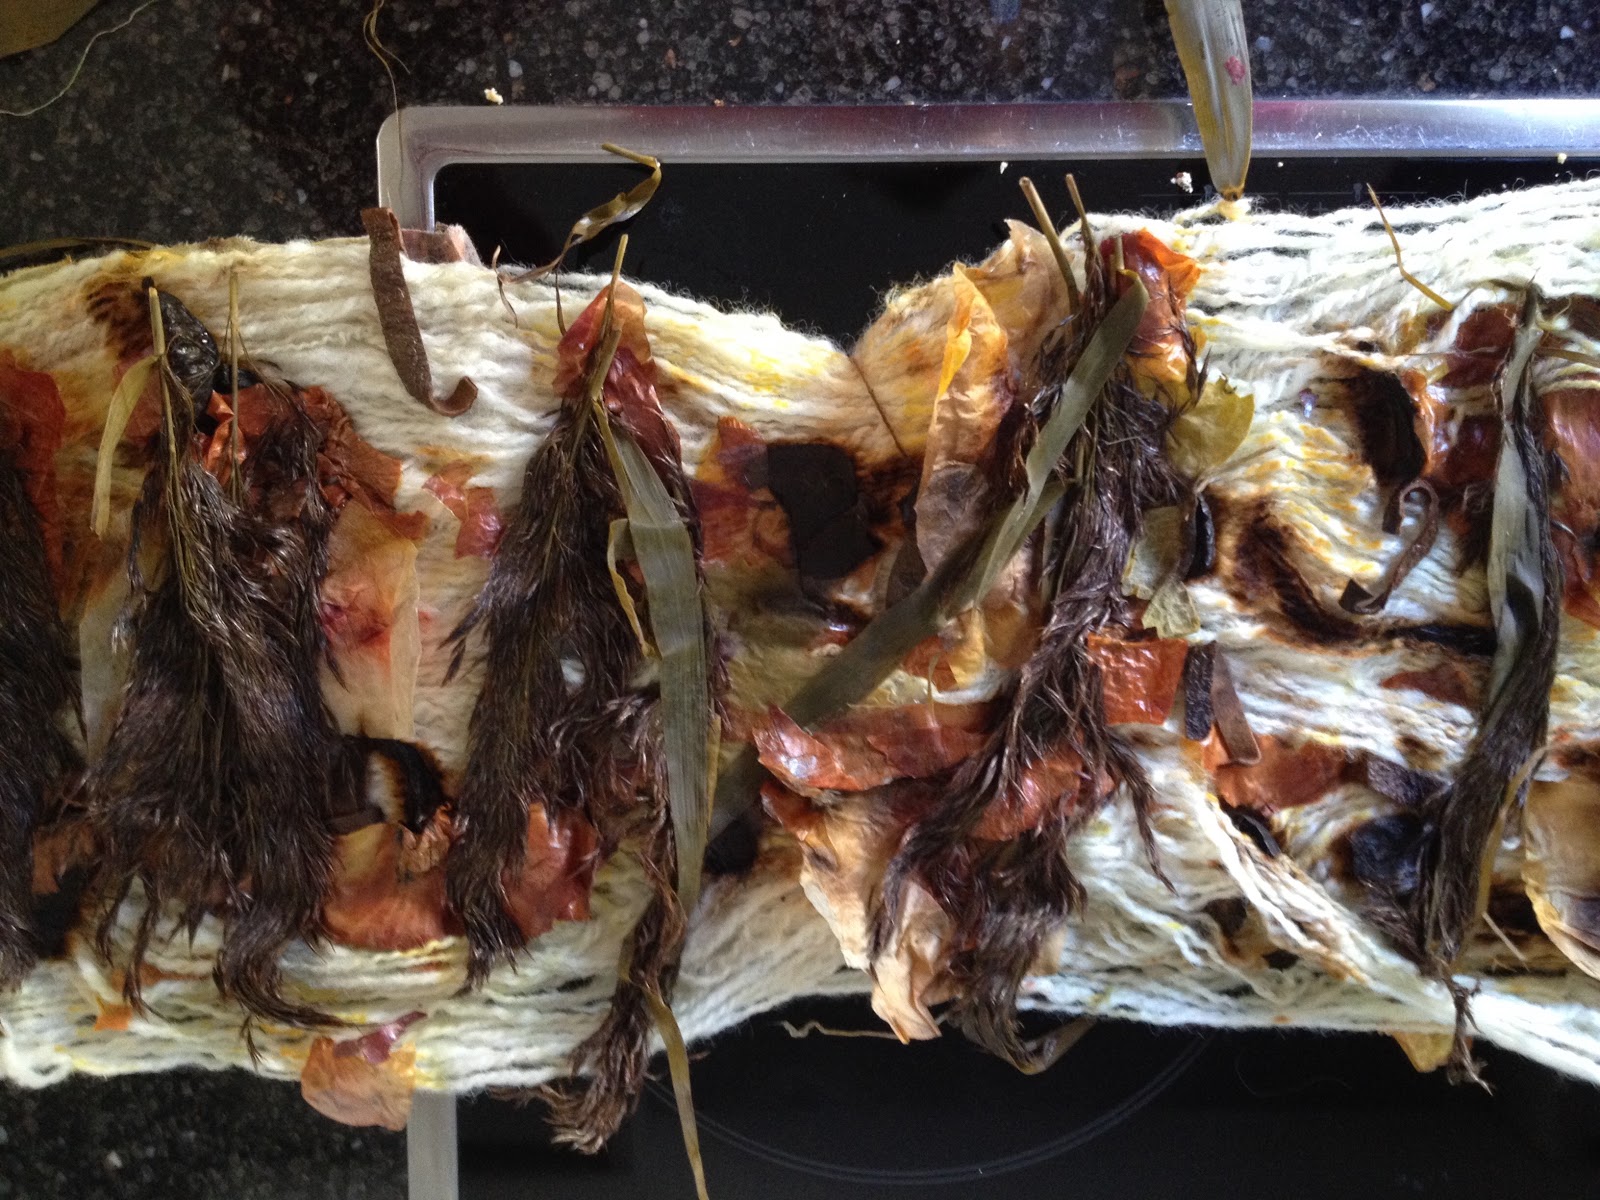
I have done the same but with my handspun yarn. You wrap the pre mordanted, moist/wet yarn together with dyeplants in a bundle, heat it (I did it in the microwave but originally you steam it), leave it to cool (I left it 4-5 days in a big glass jar so that it remains humid), unwrap and wash/dry it. This was new to me and I tried it with walnut, onion, reed, some madder and sandelwood.

I used a lot of plant material, on and betreen the strands of yarn, and also, when the bundle was all rolled up, I put an outer layer of reed plumes (is it called reed plumes?) to wrap around.

As I was afraid that small stuff would attach to the yarn and would be difficult to remove, I put the madder and sandlewood in paper teabags, just a little bit in each bag, and laid it out on the skein. But actually everything fell out quite easily afterwards, no onion flakes or walnut peel crumbs were left so there was no need to worry.

The microwave was my idea as I do not have steaming equipment and when dyeing with acid dyes one can use the microwave: 3 minutes on (max effect), 7 minutes rest, and this sequence repeated 3 times, so 30 minutes in total.

I found that the dried plant materials soaked up quite a lot of moisture that was in the yarn, and thought that, next time, either the yarn must contain more water when starting, or steaming would be better. With a little more moisture, I believe that the colour spreads a little bit wider away from the plant material. So now I found a metal sieve at a thrift store and plan to steam for the next experiment. Steaming would be done for an hour or so.

An advantage of steaming above the microwave is also that you can add some rusty parts, to do after-treatment with iron to influence colour. Yellow from onions turns green with iron. I would not dare to put skrews and bolts in the microwave, but one can include some in the bundle when steaming.

I also believe that the result is so striking because of the dark brown from the walnuts. They are really super for this method! My walnuts are gone but for next year I am already thinking to put some in the freezer. So if you still have access to walnut shells, and want to do this bundling somewhat later in the year, e.g. with spring or summer plants, put some aside!

Here you see how I put all the dye stuff in the skein and wrap it. You can also see that the whole package is wrapped in reed plumes at the outside.


This is how it looked when I unwrapped it.


And with all the plant material removed, before and after washing. You still see the spots in the skein where the various dyestuff was wrapped, especially the walnut!


And lastly, when re-skeined into a fresh skein.

Wednesday, 25 February 2015

Muddar och torgvantar

Två saker blev klara denna vecka. Båda skall bli presenter som tack för en gåva, fast det återstår att se om de passar mottagarna.

Monicas Torvantar, efter ett mönster gjort till mig av Ravelry-vännen Monica, är gjorda av tre-trådigt Garn av Dorset ull. De blev mycket fina tycker jag själv, och det går allt lättare att sticka flätorna utan hjälpsticka, till och med utan att titta på beskrivningen hela tiden.
Jag fick en gammal Louet S10 spinnrock av kvinnan som skall få dessa. Tyvärr tror jag att hon har mycket större händer än jag, och dessa torgvantar passar mig utmärkt...

Two items are completed this week, both to be gifted to someone as a thank-you for a gift received from them. It is, at least for the half-mittens, yet unclear whether they will fit.

Monicas market-mittens, a pattern made for me by a Ravelry friend (Monica), are knitted of tree-plied brown Dorset, spun on my Louet Victorie. They are quite nice, if I may say so, and the cable-knitting is getting better all the time. These cables, on 3 and 2 stitches, are made without an extra cable needle, and I even managed to knit them without looking at the instructions continuously.
The receiver of the half mittens gave me her old Louet S10 spinning wheel, and unfortunately I believe she gas much broader hands than me, and the half mittens fit me perfectly...

De röd-gråa muddarna är stickade efter ett Estniskt mönster ur boken Ornamental Journey av Kristi Joeste och Kristiina Ehin, en mycket vacker bok med många bilder på otroligt tjusiga stickade och broderade handskar och vantar, berättelser, inspiration och stickinstruktioner. Boken kan jag rekommendera varmt!

Garnet spann jag av en fäll blå texel. Det röda var färgad som kardflor, med krapprot. Eftersom den här blå texel, som brukar vara grå till svart, var av en mycket ljus sort, så blev den röda färgen ganska klar.

Mottagaren är bonden som gav mig den här ullen, från sina texel får.


The red and grey cuffs are inspired by an Estonian knitting pattern for the cuffs of a pair of mittens, described in the book ' Ornamental Journey'  by Kristi Joeste and Krisiina Ehin. A beautiful book full of pictures of stunning knitted and ornamental mittens, stories, inspiration and instructions. I can really recommend the book.

The yarn is spun of a blue texel fleece, the red is dyed with madder. This fleece was exceptionally light grey, normally blue texel is much darker. On this light grey, the madder dye takes beautifully.

The farmer who gave me this fleece will receive the cuffs.

Wednesday, 16 October 2013

Colors!

Since summer, when there was time, I spun small skeins of a lovely type of wool, long shiny curls, which, combed on mini combes and spun right of the combes, resultet in shiny miniskeins of white yarn. The length was each time something around 65-75 meters, perfect to have in storage for band-weaving.

Lately, the dyeing pot has been on the stove, to dye the skeins, one after the othe, in a relaxed and steady rythm. Dye a skein in the evening, let it cool down over night, and take it out of the pot the next evening. If there was time, the same procedure would be repeated that night, but if not- no problem, it was possible to wait for the next opportunity. And see here, what a lovely set of colors!

The upper yellow is dyed with onion peels, the others are dyed with acid dyes, that I mixed myself from red, yellow and blue. My experience is that the most beautiful colors are obtained when all three basic colors are used.

To the right, natural colors are shown, the 2 browns from Oessant sheep, the white from the same locks as the colored skeins. I really wish I knew what kind of sheep gave these curls!


Coming weeks, they will be transformed into some nice ribbons again, if and when the ribbon loom is available.

Sunday, 20 September 2009

Färgning av ull

Idag har jag färgat ull med syrafärgning. Det var lätt som en plätt!
Först så tvättade jag ullen och i sista sköljbadet tillsatte jag lite ättika som jag brukar göra.
Sedan blandade jag till färgbadet. Det skulle bli orange hade jag tänkt så det blev 2 delar rött och 1 del gult.
Först måttade jag färgpulvret...
Sedan tillsatte jag ättika till pulvret. Det hällde jag in i kastrullen med ljummet vatten som stod och väntade. Det blev ett vacker rött bad (inte orange alls).
Då var det dags att sänka ner garnet. Det var kanske för mycket garn för kastrullen men det gick ner!
Sedan skulle det värmas till (nästan) koktemperaturen och efter det så skulle det sjuda i 30 minuter. Under den tiden blev vattnet allt ljusare, färgen fastnade alltså på ullen.
Efter det så sköljde jag några gånger i varmt vatten, men det kom nästan ingen färg ifrån ullen: den hade sugit åt sig all färg!
Här ser ni det färdiga resultatet när det hänger på tork. Nu är det fortfarande väldigt blött och medan det torkar så ljusnar färgen lite grann, men inte mycket.
Vackert! Inte riktigt orange men väl en mycket mustig färg. Jag är nöjd.